· TDD · 30 min read
TDD 实现 Spring DI 容器 (三) - 字段注入与方法注入
本文为容器补充了常用的字段注入与方法注入支持。深度探讨了在 TDD 演进中如何切换测试边界,并详细解决了方法注入时在父子类调用顺序及覆盖场景下的特殊情况。
目录 (Table of Contents)
目录 (Table of Contents)
Field Injection
如何构造测试
这节个人感觉比较重要的就是对于同样的功能,在不同上下文环境下对测试风格的选择方式问题。 在某些情况下,不同的风格传递的信息或者说知识是不太一样的。而伴随你不同风格的选择可能直接影响后续功能实现的难易程度。TDD主要的难点还是在于设计,在于你对知识的理解,究竟是以一种怎样的方式呈现出来。
对于重构过后的代码,如何以何种方式来完成测试?
根据不同环境下会有不同的考量,甚至在同样的功能中选择不同风格的测试
测试不仅仅是测试,测试中还蕴含着知识的传递
字段注入
- 通过 Inject 标注将字段声明为依赖组件
- 如果组件需要的依赖不存在,则抛出异常
- 如果字段为 final 则抛出异常
- 如果组件间存在循环依赖,则抛出异常
1   // TODO: field injection
2   // TODO: throw exception if dependency not found
3   // TODO: throw exception if filed is final
4   // TODO: throw exception if cyclic dependency
我们把 ConstructorInjectionProvider 从 ContextConfig 中分离出来,也可以说我们的架构改变了,原来我们可以说是一个单体的结构,没有组件和组件间的交互。
字段注入应该是有如下形式的类:
1   class ComponentWithFieldInjection {
2       @Inject
3       Dependency dependency;
4   }
即,这个类中包含一个被 @Inject 标注的字段。
如果还是按照之前的形式构造测试的话,我们会构造出如下测测试:
1   // TODO: field injection
2   @Test
3   public void should_inject_dependency_via_field() {
4       Dependency dependency = new Dependency() {
5       };
6       config.bind(Dependency.class, dependency);
7       config.bind(ComponentWithFieldInjection.class, ComponentWithFieldInjection.class);
8       ComponentWithFieldInjection component = config.getContext().get(ComponentWithFieldInjection.class).get();
9
10      assertSame(dependency, component.dependency);
11  }
但是在之前的课上也讲过,如果你的架构变了,那么你的任务也可以变。也可以用一些更小范围的测试去测。
所以,另外的写法呢就可以是如下形式:
1   @Test
2   public void should_create_component_with_field_injection() {
3       Context context = Mockito.mock(Context.class);
4       Dependency dependency = Mockito.mock(Dependency.class);
5       Mockito.when(context.get(eq(Dependency.class)))
6               .thenReturn(Optional.of(dependency)); // Provider 内部需要使用context.get方法获取依赖
7
8       ConstructorInjectionProvider<ComponentWithFieldInjection> provider =
9               new ConstructorInjectionProvider<>(ComponentWithFieldInjection.class);
10      ComponentWithFieldInjection component = provider.get(context); // 会返回一个实例
11
12      assertSame(dependency, component.dependency);
13  }
所以,在重构过程中,随着架构的变化,你实现测试的选择也会有所不同。
对比以上两个测试,可以发现,第一个测试是一个更完整的、范围更大的端到端的功能测试,而第二个它更多的是集中在被我们抽离出来的单元本身,从某种意义上来讲,第二个测试更接近传统意义上的单元测试。
这两个测试并没有什么差别,只是选择的粒度和范围不同而已。也就是对功能上下文、功能点进行了进一步分解。
并不是功能架构拆分之后,就应该按照更小的粒度来做测试。
因为测试不仅仅是测试,其中还蕴含着功能上下文中的知识,如果使用测试替身的方式构造测试的话,就需要在测试中管理知识,有可能让新人不会很容易理解。
所以在构造测试方法时不仅包含测试的成本,也隐含着测试传递的知识。
再看看这两种测试策略在其他的功能上下文中有什么不一样。
1   // TODO: throw exception if dependency not found
2   @Test
3   public void should_throw_exception_if_filed_dependency_not_found() {
4       config.bind(ComponentWithFieldInjection.class, ComponentWithFieldInjection.class);
5
6       assertThrows(DependencyNotFoundException.class, () -> config.getContext());
7   }
如果缩小测试范围,仅针对单元本身做测试的话,测试应该会被构造成如下形式:
1   @Test
2   public void should_include_field_dependency_in_dependencies() {
3       ConstructorInjectionProvider<ComponentWithFieldInjection> provider =
4               new ConstructorInjectionProvider<>(ComponentWithFieldInjection.class);
5
6       assertArrayEquals(new Class<?>[]{Dependency.class}, provider.getDependencies().toArray(Class<?>[]::new));
7   }
为什么是构造成这种形式呢?
从源码我们可知,对依赖的检查,只需要从 provider 的 getDependencies 获取到其所需的所有的正确的依赖就可以进行正确的检查了。
后续的检查是在 getContext 时,即创建容器时(new 之前)做的,检查时需要获取到每一个组件的依赖。
所以只要 getDependencies 能返回正确的结果,那么就可以保证后续依赖缺失和循环依赖检查的代码能正确实现。

但是目前这个方法只返回了构造函数参数所需的依赖,那么后续实现只需要在这个方法返回中增加 field 中所需的依赖即可。

你会发现,实际上无论是 dependency not found 还是 循环依赖,实际上都是在 ContextConfig 中去实现的。
同理,循环依赖的情况:
1   // TODO: throw exception if cyclic dependency
2   class DependencyWithFieldInjection implements Dependency{
3       @Inject
4       ComponentWithFieldInjection component;
5   }
6   @Test
7   public void should_throw_exception_when_filed_has_cyclic_dependencies() {
8       config.bind(ComponentWithFieldInjection.class, ComponentWithFieldInjection.class);
9       config.bind(Dependency.class, DependencyWithFieldInjection.class);
10
11      assertThrows(CyclicDependenciesException.class, () -> config.getContext());
12  }
其实这里 DependencyWithFieldInjection 可以不必实现 Dependency
如果减小测试的粒度,我们会发现循环依赖的测试,其实和依赖不存在的测试是一样的:
因为检查依赖不存在和检查循环依赖都是在 checkDependencies 方法中做的
1   @Test
2   public void should_include_field_dependency_in_dependencies_() {
3       ConstructorInjectionProvider<ComponentWithFieldInjection> provider =
4               new ConstructorInjectionProvider<>(ComponentWithFieldInjection.class);
5
6       assertArrayEquals(new Class<?>[]{Dependency.class}, provider.getDependencies().toArray(Class<?>[]::new));
7 }所以对TODO: throw exception if dependency not found 和 TODO: throw exception if cyclic dependency 的测试任务可以合并为一个任务,比如:TODO: provide dependencies information for field injection,即:依赖中应包含 Inject Field 声明的依赖
1   // TODO: provide dependencies information for field injection
2   @Test
3   public void should_include_field_dependency_in_dependencies() {
4       ConstructorInjectionProvider<ComponentWithFieldInjection> provider =
5               new ConstructorInjectionProvider<>(ComponentWithFieldInjection.class);
6
7       assertArrayEquals(new Class<?>[]{Dependency.class}, provider.getDependencies().toArray(Class<?>[]::new));
8   }
经过取舍,我们选择保留以下的测试:
1   class ComponentWithFieldInjection {
2       @Inject
3       Dependency dependency;
4   }
5   // TODO: field injection
6   @Test
7   public void should_inject_dependency_via_field() {
8       Dependency dependency = new Dependency() {
9       };
10      config.bind(Dependency.class, dependency);
11      config.bind(ComponentWithFieldInjection.class, ComponentWithFieldInjection.class);
12      ComponentWithFieldInjection component = config.getContext().get(ComponentWithFieldInjection.class).get();
13
14      assertSame(dependency, component.dependency);
15  }
16
17  // TODO: provide dependencies information for field injection
18  @Test
19  public void should_include_field_dependency_in_dependencies() {
20      ConstructorInjectionProvider<ComponentWithFieldInjection> provider =
21              new ConstructorInjectionProvider<>(ComponentWithFieldInjection.class);
22
23      assertArrayEquals(new Class<?>[]{Dependency.class}, provider.getDependencies().toArray(Class<?>[]::new));
24  }
实现 should_inject_dependency_via_field
1 // TODO: field injection
2 @Test
3 public void should_inject_dependency_via_field() {
4 Dependency dependency = new Dependency() {
5 };
6 config.bind(Dependency.class, dependency);
7 config.bind(ComponentWithFieldInjection.class, ComponentWithFieldInjection.class);
8 ComponentWithFieldInjection component = config.getContext().get(ComponentWithFieldInjection.class).get();
9
10 assertSame(dependency, component.dependency);
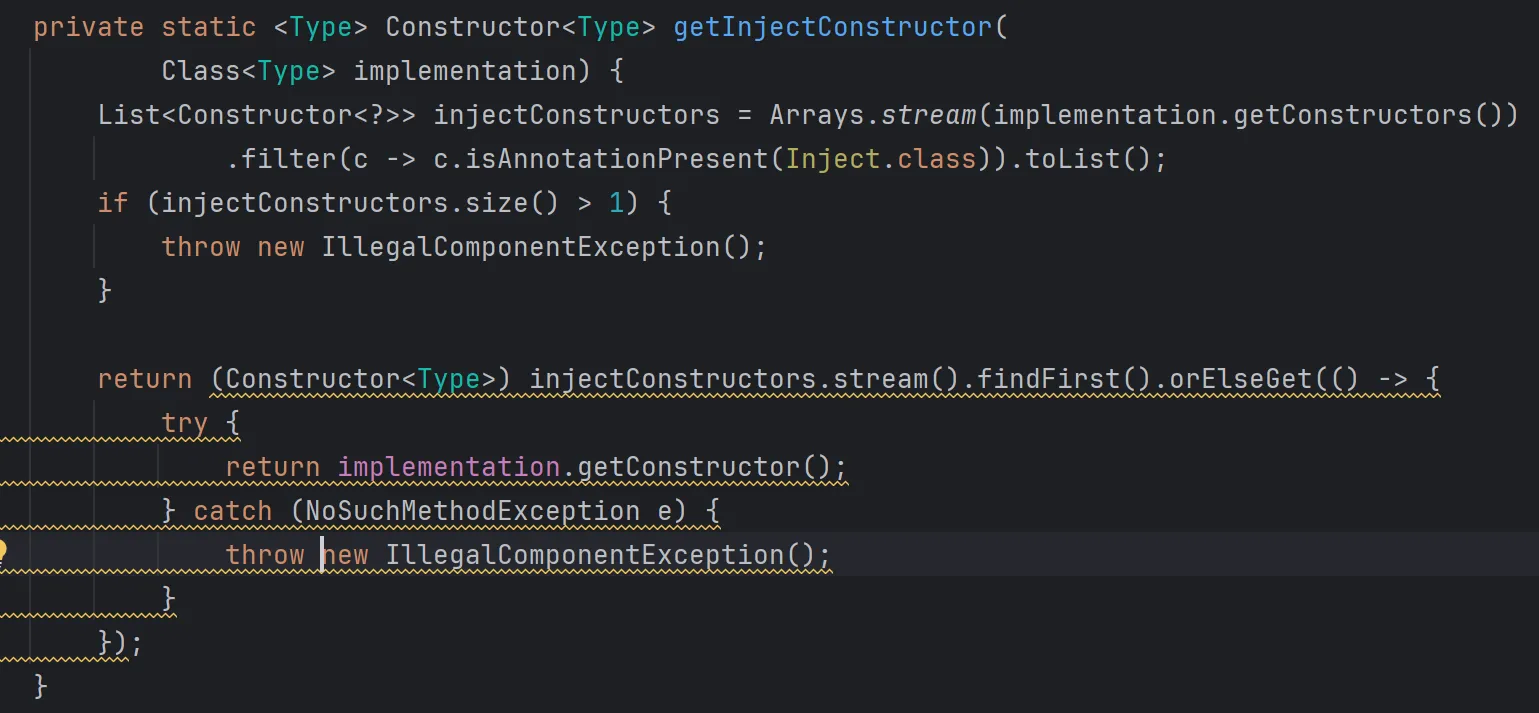
11 }运行测试,会有因为无法获取到构造函数(NoSuchMethodException)而抛出 IllegalComponentException 异常
首先需要将 ComponentWithFieldInjection 修改为静态内部类
1   static class ComponentWithFieldInjection {
2       @Inject
3       Dependency dependency;
4   }
这里也可以将这个类定义为最顶层的类,就和前面构造的 Component 、Dependency 一样,那么修改的代码就要少一点。
并且需要使用 getDeclaredConstructor 来获取构造函数。
1 return implementation.getDeclaredConstructor();
ComponentWithFieldInjection是一个非静态内部类(即它是在另一个类的内部定义的类,并且不带有static关键字),它的构造函数需要调用外部类的构造函数。如果是静态内部类,则不需要这样做。
对于非静态内部类(即没有使用
static关键字修饰的内部类),其构造函数实际上是私有的,并且会附加一个对外部类实例的引用。这意味着,即使您没有显式定义构造函数,编译器也会为您生成一个私有的构造函数,该构造函数接受一个外部类的实例作为参数。假设您有一个外部类
OuterClass和一个非静态内部类ComponentWithFieldInjection,如下所示:1 public class OuterClass { 2 private Dependency dependency; 3 4 public class ComponentWithFieldInjection { 5 private Dependency dependency; 6 } 7 }在这种情况下,您不能直接通过
getConstructor获取到ComponentWithFieldInjection的构造函数,因为该构造函数是私有的,并且它实际上接受一个OuterClass实例作为参数。为了获取非静态内部类的构造函数,您需要使用
getDeclaredConstructor并且指定参数类型,如下所示:1 try { 2 Constructor<ComponentWithFieldInjection> constructor = 3 OuterClass.class.getDeclaredConstructor(OuterClass.class); 4 } catch (NoSuchMethodException e) { 5 // 处理异常 6 }请注意,上述代码中的
getDeclaredConstructor要求您知道构造函数的确切签名。由于构造函数是私有的,您还需要调用setAccessible(true)来允许访问它:1 constructor.setAccessible(true);但是,通常情况下,您并不需要直接通过反射来创建非静态内部类的实例。通常的做法是通过外部类的实例来创建内部类的实例。例如:
1   OuterClass outerInstance = new OuterClass();
2   ComponentWithFieldInjection component = outerInstance.new ComponentWithFieldInjection();
总结一下,对于非静态内部类,您不能直接使用
getConstructor来获取其构造函数,而需要使用getDeclaredConstructor并且可能需要调用setAccessible(true)来访问私有构造函数。
在Java中,
getDeclaredConstructor和getConstructor都是用于通过反射来获取类的构造函数的方法,但它们之间存在一些重要的区别:
getConstructor:
- 这个方法是从
Class类继承来的,用于获取公开的构造函数。- 它可以获取到类的公共构造函数,包括从父类继承来的构造函数。
- 如果类中有多个公共构造函数,你可以通过指定参数类型数组来获取特定的构造函数。
- 如果类没有公共构造函数或者没有匹配给定参数类型的构造函数,这个方法会抛出
NoSuchMethodException。
getDeclaredConstructor:
- 这个方法也是从
Class类继承来的,但它用于获取类中声明的构造函数,无论这些构造函数是否是公共的。- 它可以获取到类本身的构造函数,包括私有的、受保护的、包私有的以及公共的构造函数,但不会获取从父类继承的构造函数。
- 同样地,你可以通过指定参数类型数组来获取特定的构造函数。
- 如果类中没有声明匹配给定参数类型的构造函数,这个方法会抛出
NoSuchMethodException。示例
假设我们有一个类
MyClass:1 public class MyClass { 2 private MyClass() { } // 私有构造函数 3 public MyClass(String name) { } // 公共构造函数 4 }我们可以这样使用这两个方法:
1   try {
2       Class<MyClass> clazz = MyClass.class;
3
4       // 获取公共构造函数
5       Constructor<MyClass> publicConstructor = clazz.getConstructor(String.class);
6
7       // 获取声明的构造函数(包括私有的)
8       Constructor<MyClass> declaredPrivateConstructor = clazz.getDeclaredConstructor();
9
10      // 访问私有构造函数
11      declaredPrivateConstructor.setAccessible(true);
12      MyClass instance = declaredPrivateConstructor.newInstance();
13
14  } catch (NoSuchMethodException | IllegalAccessException | InstantiationException | InvocationTargetException e) {
15      e.printStackTrace();
16  }
总结
getConstructor主要用于获取类的公共构造函数。getDeclaredConstructor主要用于获取类中声明的所有构造函数,包括非公共的构造函数。如果你想要获取一个类中的所有构造函数,不论它们的访问级别如何,应该使用
getDeclaredConstructors方法,而不是单个构造函数的版本。
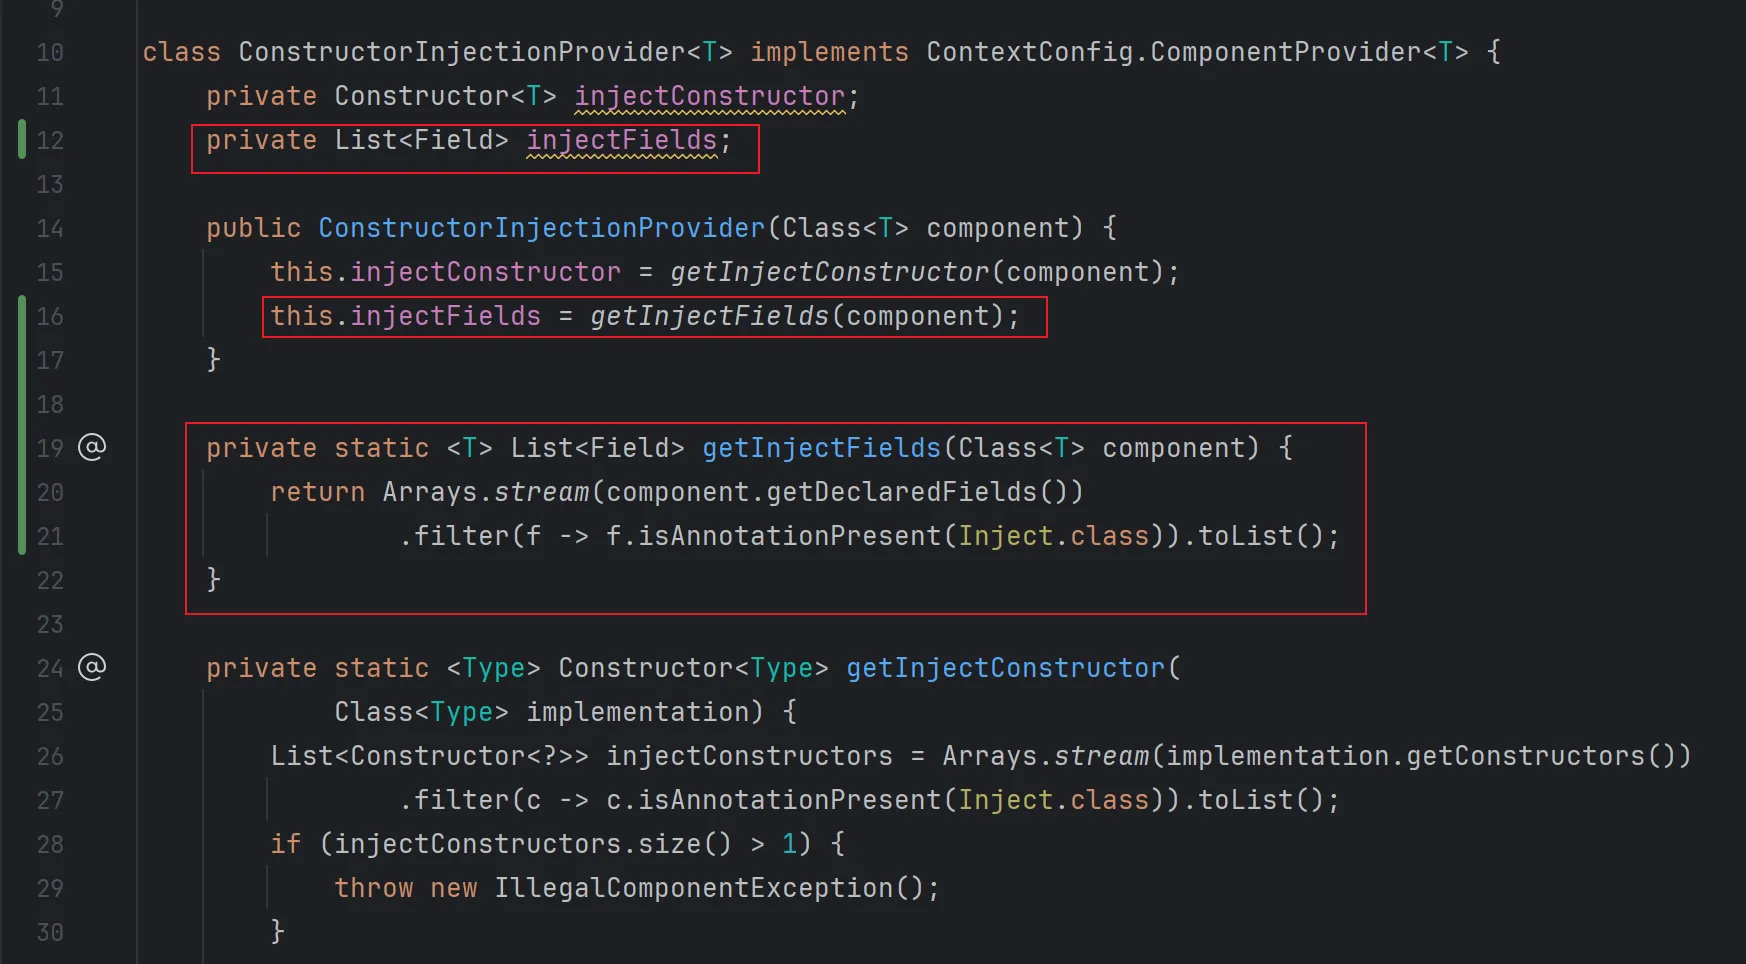
获取到构造函数之后,就可以创建实例,因为依赖是字段不是构造函数的参数,所以还需要知道有哪些被 @Inject 标注的字段
获取到字段,并创建好实例后就需要给字段赋值:
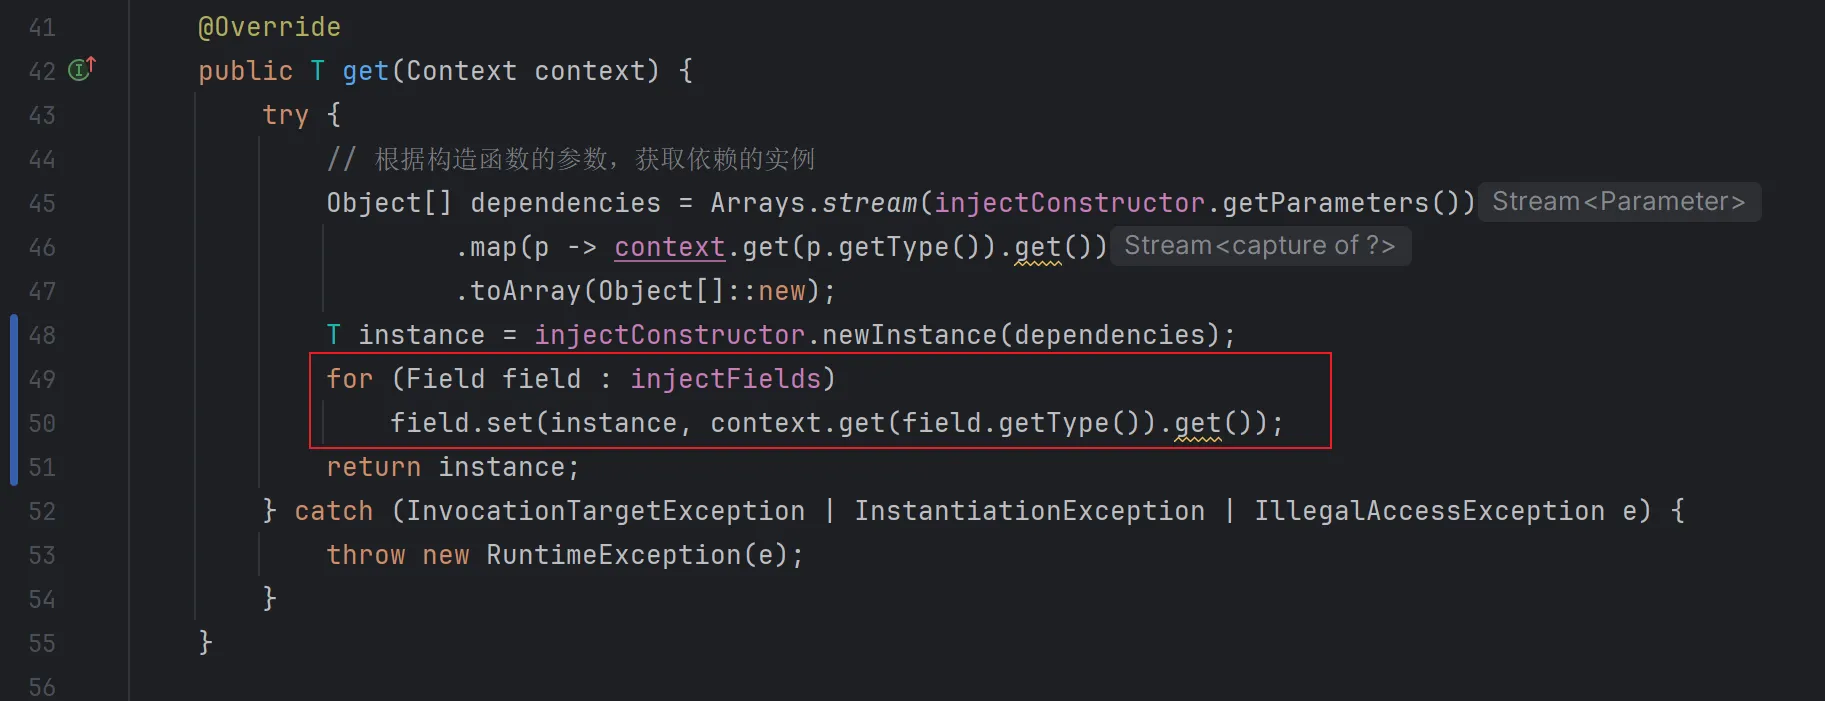
即,根据依赖的字段的类型,从容器中获取该类型的实例,并赋值到该字段中。
运行测试,测试通过。
实现 provide dependencies information for field injection
1   // TODO: provide dependencies information for field injection
2   @Test
3   public void should_include_field_dependency_in_dependencies() {
4       ConstructorInjectionProvider<ComponentWithFieldInjection> provider =
5               new ConstructorInjectionProvider<>(ComponentWithFieldInjection.class);
6
7       assertArrayEquals(new Class<?>[]{Dependency.class}, provider.getDependencies().toArray(Class<?>[]::new));
8   }
只需要在 getDependencies 方法的返回结果中增加字段注入的依赖:
1   @Override
2   public List<Class<?>> getDependencies() {
3       Stream<? extends Class<?>> b = injectFields.stream().map(Field::getType);
4       Stream<? extends Class<?>> a = Arrays.stream(injectConstructor.getParameters()).map(Parameter::getType);
5       return Stream.concat(a, b).collect(Collectors.toList());
6   }
对 Subclass 的支持
新建一个子类:
1   static class SubclassWithFieldInjection extends ComponentWithFieldInjection {
2   }
构造测试
1   @Test
2   public void should_inject_dependency_via_superclass_inject_filed() {
3       Dependency dependency = new Dependency() {
4       };
5       config.bind(Dependency.class, dependency);
6       config.bind(SubclassWithFieldInjection.class, SubclassWithFieldInjection.class);
7       SubclassWithFieldInjection component = config.getContext().get(SubclassWithFieldInjection.class).get();
8
9       assertSame(dependency, component.dependency);
10  }
运行测试:
1   Expected :world.nobug.tdd.di.ContainerTest$ComponentConstruction$FieldInjection$2@479cbee5
2   Actual   :null
这是因为,当前在取注入的字段时,只取了当前类的字段:
1   private static <T> List<Field> getInjectFields(Class<T> component) {
2       return Arrays.stream(component.getDeclaredFields())
3               .filter(f -> f.isAnnotationPresent(Inject.class)).toList();
4   }
实际上,还需要获取到父类的字段,可以通过递归的方式,找到父类的所有的注入字段:
1   private static <T> List<Field> getInjectFields(Class<T> component) {
2       List<Field> injectFields = new ArrayList<>();
3       Class<?> current = component;
4       while (current != Object.class) {
5           injectFields.addAll(Arrays.stream(current.getDeclaredFields())
6                   .filter(f -> f.isAnnotationPresent(Inject.class)).toList());
7           current = current.getSuperclass();
8       }
9       return injectFields;
10  }
Method Injection
方法注入
通过 Inject 标注的方法,其参数为依赖组件
通过 Inject 标注的无参数方法,会被调用
按照子类中的规则,覆盖父类中的 Inject 方法
如果组件需要的依赖不存在,则抛出异常
如果方法定义类型参数,则抛出异常
如果组件间存在循环依赖,则抛出异常
方法测试的任务列表:
1   // TODO inject method with no dependencies will be called
2   // TODO inject method with dependencies will be injected
3   // TODO override inject method from superclass
4   // TODO include dependencies from inject methods
5   // TODO throw exception if type parameter defined
无参方法注入
定义一个带有无参方法注入的类
1   static class InjectMethodWithNoDependencies {
2       boolean called = false; // 用于验证方法是否被调用
3
4       @Inject
5       void install() {
6           called = true;
7       }
8   }
定义测试:
1   // TODO: inject method with no dependencies will be called
2   @Test
3   public void should_call_inject_method_with_no_dependencies() {
4       config.bind(InjectMethodWithNoDependencies.class, InjectMethodWithNoDependencies.class);
5       InjectMethodWithNoDependencies instance = config.getContext().get(InjectMethodWithNoDependencies.class).get();
6
7       assertTrue(instance.called);
8   }
实现,同理先找到并记录所有被 @Inject 标注的方法
获取实例时,调用这些方法注入依赖:

有参方法注入
新建有参方法注入类:
1   static class InjectMethodWithDependencies {
2       Dependency dependency;
3
4       @Inject
5       void install(Dependency dependency) {
6           this.dependency = dependency;
7       }
8   }
构造测试
1   // TODO: inject method with dependencies will be injected
2   @Test
3   public void should_call_inject_method_with_dependencies() {
4       Dependency dependency = new Dependency() {
5       };
6       config.bind(Dependency.class, dependency);
7       config.bind(InjectMethodWithDependencies.class, InjectMethodWithDependencies.class);
8       InjectMethodWithDependencies instance = config.getContext().get(InjectMethodWithDependencies.class).get();
9
10      assertSame(dependency, instance.dependency);
11  }
运行测试,直接通过,说明不需要修改生产代码。
对依赖的检查
检查依赖是否存在、是否存在循环依赖
构造测试,减小测试的粒度,直接对 ConstructorInjectionProvider 进行测试:
1   // TODO: include dependencies from inject methods
2   @Test
3   public void should_include_method_dependency_in_dependencies() {
4       ConstructorInjectionProvider<InjectMethodWithDependencies> provider =
5               new ConstructorInjectionProvider<>(InjectMethodWithDependencies.class);
6
7       assertArrayEquals(new Class<?>[]{Dependency.class}, provider.getDependencies().toArray(Class<?>[]::new));
8   }
同理需要在 getDependencies 方法中增加返回方法注入点所需的依赖参数。
1   @Override
2   public List<Class<?>> getDependencies() {
3       Stream<? extends Class<?>> b = injectFields.stream().map(Field::getType);
4       Stream<? extends Class<?>> a = Arrays.stream(injectConstructor.getParameters()).map(Parameter::getType);
5       Stream<Class<?>> c = injectMethods.stream().flatMap(m -> Arrays.stream(m.getParameterTypes()));
6       Stream<Class<?>> concat = Stream.concat(a, b);
7       return Stream.concat(concat, c).collect(Collectors.toList());
8   }
使用 flatMap 的原因:
由于
getParameterTypes()返回的是一个Class<?>[]数组,每次调用都会返回多个元素,而不是单个元素。因此,如果你直接使用map操作来转换这些数组,你将得到一个由多个Class<?>[]组成的流,而不是一个扁平化的流,其中包含所有的Class<?>对象。为了解决这个问题,你需要使用
flatMap操作来“展平”这些数组,将它们合并成一个单一的流,这样你就可以继续对这个流进行操作,比如收集结果到一个列表中。
父类和子类的方法注入
方法注入的难点,主要是在子类和父类之间方法注入的调用关系
子类注册时,需要调用父类的注入点方法
新建父子类:
1   // TODO: override inject method from superclass
2   static class SuperClassWithInjectMethod {
3       boolean superCalled = false;
4       @Inject
5       void install() {
6           superCalled = true;
7       }
8   }
9   static class SubclassWithInjectMethod extends SuperClassWithInjectMethod {
10      boolean subCalled = false;
11      @Inject
12      void installAnother() {
13          subCalled = true;
14      }
15  }
构造测试:
1   @Test
2   public void should_inject_dependencies_via_inject_method_from_superclass() {
3       config.bind(SubclassWithInjectMethod.class, SubclassWithInjectMethod.class);
4       SubclassWithInjectMethod instance = config.getContext().get(SubclassWithInjectMethod.class).get();
5
6       assertTrue(instance.superCalled);
7       assertTrue(instance.subCalled);
8   }
运行测试,测试不通过,父类的注入方法不会被调用,superCalled 为 false:
1   Expected :true
2   Actual   :false
原因是,获取方法注入点时,只获取了当前类的方法:
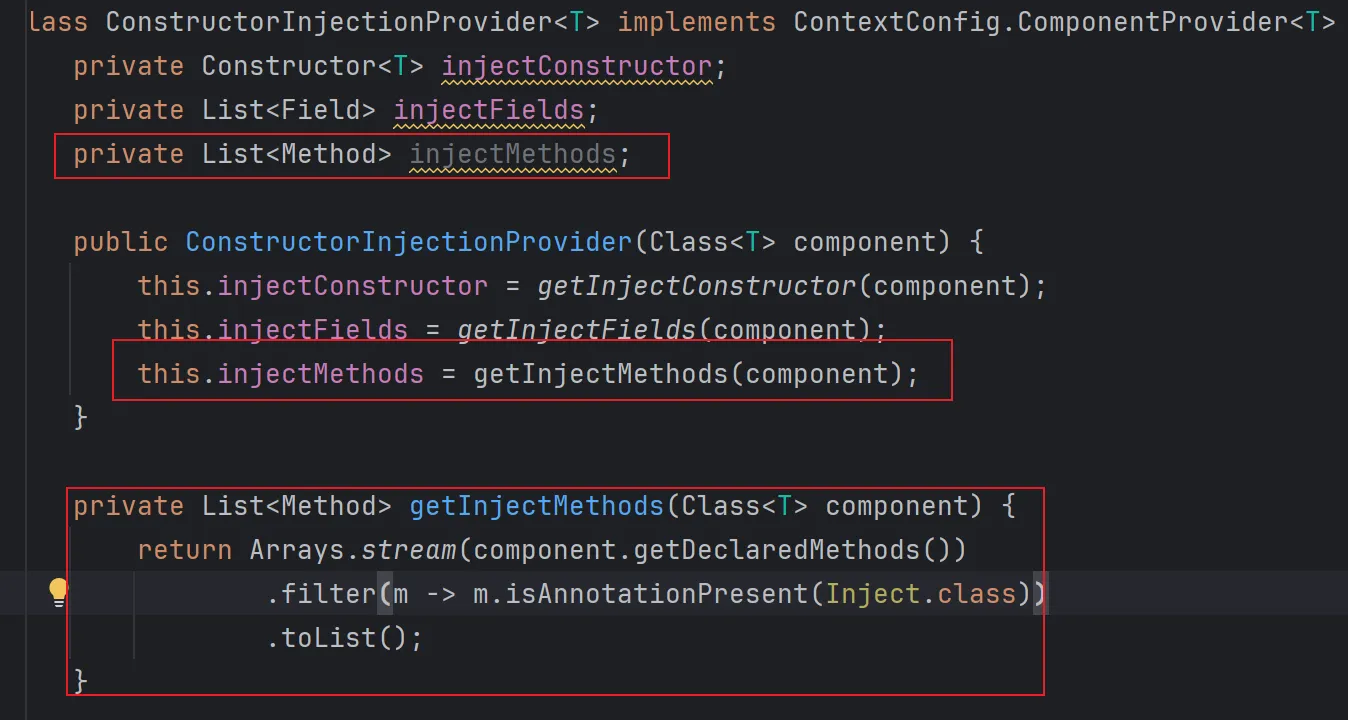
1   private List<Method> getInjectMethods(Class<T> component) {
2       return Arrays.stream(component.getDeclaredMethods())
3               .filter(m -> m.isAnnotationPresent(Inject.class))
4               .toList();
5   }
类似于获取父类字段注入点的逻辑,通过递归找到父类注入方法的形式获取:
1   private List<Method> getInjectMethods(Class<T> component) {
2       Class<T> current = component;
3       List<Method> injectMethods = new ArrayList<>();
4       while (current != Object.class) {
5           injectMethods.addAll(Arrays.stream(current.getDeclaredMethods())
6                   .filter(m -> m.isAnnotationPresent(Inject.class))
7                   .toList());
8           current = (Class<T>) current.getSuperclass();
9       }
10      return injectMethods;
11  }
子类注册时,先调用父类的注入点方法
在注册子类时,不仅要调用父类的注入点方法,而且需要让父类的注入点方法优先于子类的注入点方法调用
修改父子类的内部状态,通过数值确定调用的顺序:
1   // TODO: override inject method from superclass
2   static class SuperClassWithInjectMethod {
3       int superCalled = 0;
4       @Inject
5       void install() {
6           superCalled = 1;
7       }
8   }
9   static class SubclassWithInjectMethod extends SuperClassWithInjectMethod {
10      int subCalled = 0;
11      @Inject
12      void installAnother() {
13          subCalled = superCalled + 1;
14      }
15  }
修改测试:
1   @Test
2   public void should_inject_dependencies_via_inject_method_from_superclass() {
3       config.bind(SubclassWithInjectMethod.class, SubclassWithInjectMethod.class);
4       SubclassWithInjectMethod instance = config.getContext().get(SubclassWithInjectMethod.class).get();
5
6       assertEquals(1, instance.superCalled);
7       assertEquals(2, instance.subCalled);
8   }
运行测试,测试不通过,说明子类先于父类执行注入点方法。
因为,子类的注入点方法是先于父类的注入点方法加入到方法列表的,这里最简单的实现就是将方法列表 reverse 倒序一下:
1   private List<Method> getInjectMethods(Class<T> component) {
2       Class<T> current = component;
3       List<Method> injectMethods = new ArrayList<>();
4       while (current != Object.class) {
5           injectMethods.addAll(Arrays.stream(current.getDeclaredMethods())
6                   .filter(m -> m.isAnnotationPresent(Inject.class))
7                   .toList());
8           current = (Class<T>) current.getSuperclass();
9       }
10      Collections.reverse(injectMethods);
11      return injectMethods;
12  }
Override 注入点方法的情况
在 @Inject 的描述中,关于方法的注入有如下的限制:
A method annotated with @Inject that overrides another method annotated with @Inject will only be injected once per injection request per instance. A method with no @Inject annotation that overrides a method annotated with @Inject will not be injected.
被 @Inject 注解的方法如果覆盖了另一个同样被 @Inject 注解的方法,则在每次实例的注入请求中只会被注入一次。没有 @Inject 注解的方法如果覆盖了一个被 @Inject 注解的方法,则不会被注入。
说明:这里的调用一次是指只调用子类中的方法,不会调用父类的方法。
子类覆盖的方法被 Inject 标注
修改测试的父类:
更好的方法是子类和父类设置不同的值,使用++递增的话,不能很明确的知道是应该调用哪个方法。这里应该调用的是子类中的方法。
1   // TODO: override inject method from superclass
2   static class SuperClassWithInjectMethod {
3       int superCalled = 0;
4       @Inject
5       void install() {
6           superCalled++;
7       }
8   }
构造测试,验证父类的注入点方法被带有Inject方法覆盖时,父类的注入点方法不会被调用,只会调用一次子类的调用点方法。
1 static class SubclassWithOverrideInjectMethod extends SuperClassWithInjectMethod {
2 @Inject
3 void install() {
4 super.install();
5 }
6 }
7 @Test
8 public void should_only_call_once_if_subclass_override_superclass_inject_method_with_inject() {
9 config.bind(SubclassWithOverrideInjectMethod.class, SubclassWithOverrideInjectMethod.class);
10 SubclassWithOverrideInjectMethod instance = config.getContext().get(SubclassWithOverrideInjectMethod.class).get();
11
12 assertEquals(1, instance.superCalled);
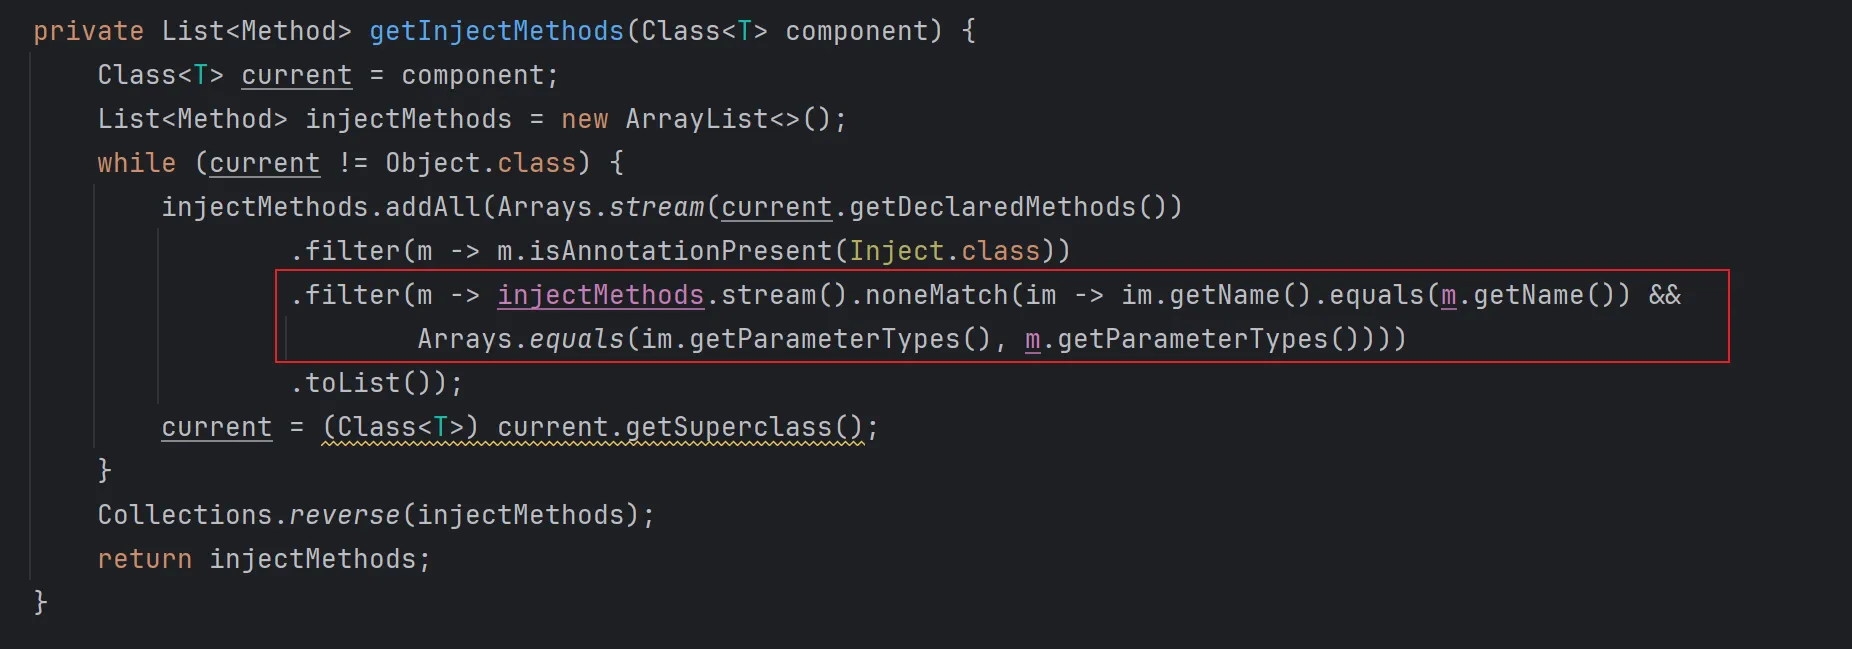
13 }实现,在获取注入点方法时,需要判断如果父类的注入点方法被覆盖,那么可以将其过滤掉,即可以不用被调用。
因为这里是先找到子类的方法,所以可以从目前找到的方法中再判断是否有和当前类(父类)同名、同签名的方法(即覆盖的方法),有则过滤掉。
子类覆盖的方法未被 Inject 标注
这里子类和父类的方法应该要都不会被调用
1   static class SuperClassWithInjectMethod {
2       int superCalled = 0;
3       @Inject
4       void install() {
5           superCalled++;
6       }
7   }
8   static class SubclassWithOverrideInjectMethodWithoutInject extends SuperClassWithInjectMethod {
9       void install() {
10          super.install();
11      }
12  }
13  @Test
14  public void should_only_call_once_if_subclass_override_superclass_inject_method_without_inject() {
15      config.bind(SubclassWithOverrideInjectMethodWithoutInject.class, SubclassWithOverrideInjectMethodWithoutInject.class);
16      SubclassWithOverrideInjectMethodWithoutInject instance = config.getContext().get(SubclassWithOverrideInjectMethodWithoutInject.class).get();
17
18      assertEquals(0, instance.superCalled);
19  }
测试不通过,所以就是有一个被 Inject 标注的方法被加入到了注入点列表中。
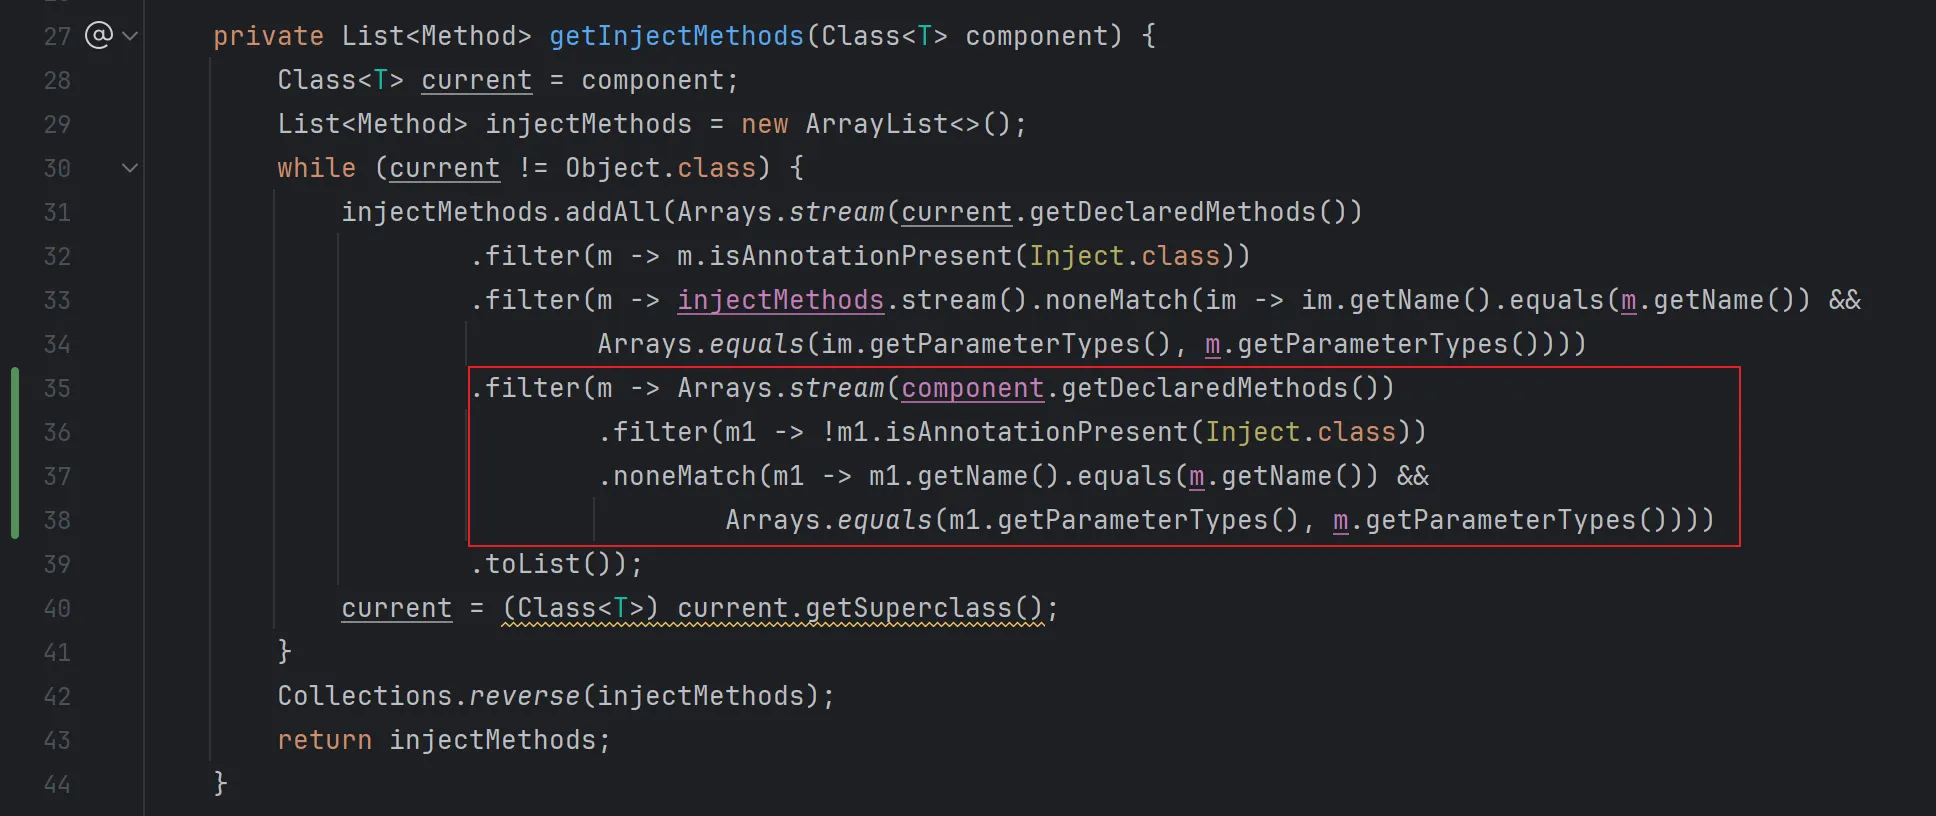
子类的方法中需要调用 super.install(); 应该是因为该方法被覆盖,调用时执行的是子类的方法。
所以要解决这个问题,还是要避免将父类的被 Inject 标注的方法加入的注入点方法列表。
实现:
1   private List<Method> getInjectMethods(Class<T> component) {
2       Class<T> current = component;
3       List<Method> injectMethods = new ArrayList<>();
4       while (current != Object.class) {
5           injectMethods.addAll(Arrays.stream(current.getDeclaredMethods())
6                   .filter(m -> m.isAnnotationPresent(Inject.class))
7                   .filter(m -> injectMethods.stream().noneMatch(im -> im.getName().equals(m.getName()) &&
8                           Arrays.equals(im.getParameterTypes(), m.getParameterTypes())))
9                   .filter(m -> Arrays.stream(component.getDeclaredMethods())
10                          .filter(m1 -> !m1.isAnnotationPresent(Inject.class))
11                          .noneMatch(m1 -> m1.getName().equals(m.getName()) &&
12                                  Arrays.equals(m1.getParameterTypes(), m.getParameterTypes())))
13                  .toList());
14          current = (Class<T>) current.getSuperclass();
15      }
16      Collections.reverse(injectMethods);
17      return injectMethods;
18  }
Sad Path
目前,还剩下几个 sad path,完成这几个 sad path 那么注入部分就大体上完成了。
如果注册的组件不可实例化,则抛出异常
抽象类
接口
1   // TODO: abstract class
2 // TODO: interface- 字段注入
- 如果字段为 final 则抛出异常
1 // TODO: throw exception if filed is final- 方法注入
- 如果方法定义类型参数,则抛出异常
1   // TODO: throw exception if type parameter defined
2
3   /**
4   在 Inject 的注释中有一个 do not declare type parameters of their own. 的注释,即不要在方法上声明类型参数
5   */
在Java中,类型参数(Type Parameter)是泛型编程的基础概念之一。它允许你在定义类或方法时使用一种占位类型的机制,这种占位类型可以在使用这些类或方法时具体化为实际的类型。类型参数通常用于实现泛型类、接口或方法,以便它们可以处理多种数据类型而不需要为每种类型重复代码。
类型参数通常用一个大写字母表示,如
E,T,K等,但也可以使用任何有效的标识符。例如,在定义一个泛型类时,你可以这样写:1 public class Box<T> { 2 private T item; 3 4 public void set(T item) { 5 this.item = item; 6 } 7 8 public T get() { 9 return item; 10 } 11 }在这个例子中,
T就是一个类型参数。当你创建Box类的实例时,你需要指定T的实际类型,例如:1 Box<String> stringBox = new Box<>(); // T is String 2 Box<Integer> intBox = new Box<>(); // T is Integer这里,
T分别被具体化为String和Integer类型。类型参数还可以有边界限制,这意味着你可以指定一个类型参数必须是某个特定类的子类或者实现某个特定接口。例如:
1   public class Box<T extends Comparable<T>> {
2    // ...
3   }
这表示
T必须实现Comparable接口。这样,你就可以在类内部安全地调用T的compareTo方法。
注册抽象类
创建抽象类:
这里使用构造器注入,其实这里不用实现 Component 也是可以的
1   abstract class AbstractComponent implements Component{
2       @Inject
3       public AbstractComponent() {
4       }
5   }
构造测试:
1   @Test
2   public void should_throw_exception_if_component_is_abstract() {
3       assertThrows(IllegalComponentException.class, () -> new ConstructorInjectionProvider<>(AbstractComponent.class));
4   }
实现,创建 ConstructorInjectionProvider 时校验其是否为抽象类
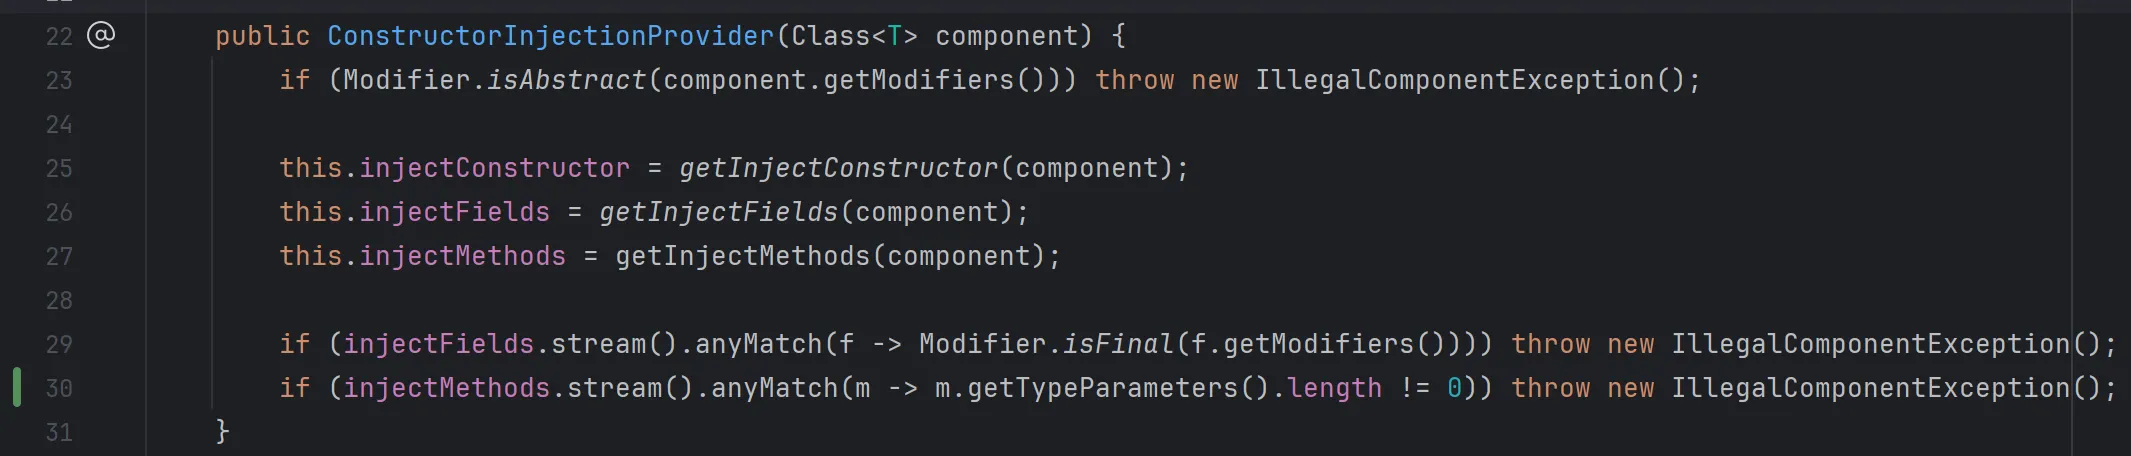
1   public ConstructorInjectionProvider(Class<T> component) {
2       if (Modifier.isAbstract(component.getModifiers())) throw new IllegalComponentException();
3
4       this.injectConstructor = getInjectConstructor(component);
5       this.injectFields = getInjectFields(component);
6       this.injectMethods = getInjectMethods(component);
7   }
注册接口
不需要创建新类,直接可以注册 Component 接口
构造测试:
1   // TODO: interface
2   @Test
3   public void should_throw_exception_if_component_is_interface() {
4       assertThrows(IllegalComponentException.class, () -> new ConstructorInjectionProvider<>(Component.class));
5   }
运行测试,直接通过,因为接口的 Modifier 本身就是抽象的。
字段注入时,字段为 final 时
新建测试类:
1   static class FinalInjectField {
2       @Inject
3       final Dependency dependency = null;
4   }
新建测试:
1   @Test
2   public void should_throw_exception_if_field_is_final() {
3       assertThrows(IllegalComponentException.class, () -> new ConstructorInjectionProvider<>(FinalInjectField.class));
4   }
实现:
可以在 getInjectFields 中检查并抛出异常,也可以在 ConstructorInjectionProvider 构造函数中检查并抛出异常,这里是在构造函数中检查。
1   public ConstructorInjectionProvider(Class<T> component) {
2           if (Modifier.isAbstract(component.getModifiers())) throw new IllegalComponentException();
3
4           this.injectConstructor = getInjectConstructor(component);
5           this.injectFields = getInjectFields(component);
6           this.injectMethods = getInjectMethods(component);
7
8           if (injectFields.stream().anyMatch(f -> Modifier.isFinal(f.getModifiers()))) throw new IllegalComponentException();
9       }
方法定义类型参数
新建类
1   static class InjectMethodWithTypeParameter {
2       @Inject
3       <T> void install() {
4       }
5   }
构造测试:
1   @Test
2   public void should_throw_exception_if_method_has_type_parameter() {
3       assertThrows(IllegalComponentException.class, () -> new ConstructorInjectionProvider<>(InjectMethodWithTypeParameter.class));
4   }
实现: